Automating the creation of a two-page weekly calendar
[apple scripts The Getting Things Done (TM) ecosystem has a rich marketplace of doodads and dawdles that help support their productivity regime. Last year, I paid them $19 for a PDF that consisted of 52+ two-sided sheets, each a week-at-a-glance in the style of GTD. Each page has the page’s date range displayed at the top left, two mini-month calendars in the top right, one for last month and one for the following month, and then space for you to record what’s going to happen on each of the days, again in GTD style.
 |
|---|
| A picture of the top of the GTD calendar page. |
Last year, I found those pages useful as I tried to find a consistent way of organizing my daily and weekly work. From time to time, though, I’d look at these two-page, GTD week-at-a-glance sheets and asked myself if I could use my meager coding skills to save twenty bucks. Could I do it in LaTeX? Using AppleScript? In HTML with some CSS and PHP? Could I do it for less than twenty bucks of my time?
 |
|---|
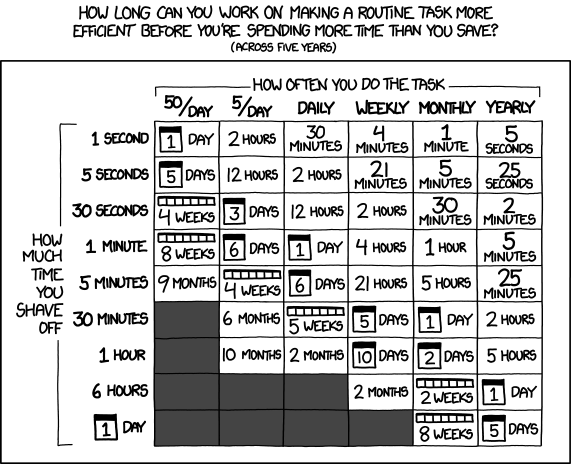
| XKCD Comic ‘Is it Worth the Time?’ |
When it came to springing $19 for a second year of these pages, my thoughts again turned to rolling my own calendar. To my surprise, the tools for making these week-based two-page calendars is actually baked into Apple’s spreadsheet app Numbers. In this post, I’ll describe how I used Numbers to create a semi-automated process for generating my two-page week calendars.
My description will be organized according to the parts of the pages: mini-calendars, the recording spaces for the days, and the date range label at the top of the first page. I’ll start with some comments on a frameworks that supports all these elements.
Note that this write-up goes into some detail about the functions I wrote for this project. If you’re only interested in the spreadsheet itself, you can download it HERE.
Organization
My spreadsheet is organized into two sheets. The first is for settings that will determine the contents of the two-page calendars. The second is for the output the I will print. The parameter values on the settings sheet determine how the dates on the two-page calendar on the second sheet will appear.
At the start of the settings sheet, we have three tables that specify the following aspects of the calendar we want:
- The year by typing a four digit number
- The month by selecting from a pop-up/pull-down list, and
- The week (first, second, etc.) by selecting from a pop-up/pull-down list.
The pop-up/pull-down list is a formatting option for a cell’s content type. (Listed in the same menu that allows you to specify a date, or text, or numeric content types, for example.) When you select the pop-up/pull-down format, you’re given a way to populate the list of options that will appear in the list.
It’s interesting to note that the Numbers template I pulled this from did not have a separate sheet for settings. Instead, the template put the settings parameters into rows (or columns) of the output tables themselves and then HID THOSE ROWS OR COLUMNS from view. Sneaky, right? Since I am interested in creating calendars for printing and not for electronic use, I prefer using a separate sheet for settings so the settings are visible to the user and the output sheet is clean with nothing hidden.
The next table on my Settings sheet captures the user settings from the previous tables for year (cell A1), month (cell B2), and week (cell B4) and calculates some auxiliary information from them. I call this the Dashboard table. First, it calculates which day of the week the first day of the month is.
=DAYNAME(VLOOKUP(B2,'Table for MINI-CALENDAR computations'::D3:E14,2)&"/1/"&A1)
Here the Table for MINI-CALENDAR computations has regions to assist in calculations. In the above formula, we use a table to gives each month an ordinal value from 1 to 12.
Second, the Dashboard table includes a calculation for the date of the first Monday of the month (cell D3). This calculation depends on whether the first day of the month is a weekday or on the weekend. In the former case, we just step backward to the of that week Monday. If the latter case, we step forward to the first Monday in the month.
=IF(VLOOKUP(D2,Days of the Week::A1:B7,2)<6,DATE(A1,VLOOKUP(B2,'Table for MINI-CALENDAR computations'::D3:E14,2),1)−DURATION(0,VLOOKUP(D2,Days of the Week::A1:B7,2,close-match)−1),DATE(A1,VLOOKUP(B2,'Table for MINI-CALENDAR computations'::D3:E14,2),1)+8−VLOOKUP(D2,Days of the Week::A1:B7,2))
Here the Days of the Week table in this formula gives each day an ordinal value from 1 to 7.
We use the result of this formula (cell D3) as the basis to find the Monday of the week we want to start our calendar.
To find the date of the Monday we want (cell D4), we start from the first week and use the DURATION() function to step forward the number of additional weeks we want
=D3+DURATION(VLOOKUP(B4,Ordinals::A1:B5,2)−1)
Here the ‘Ordinals’ table in this formula gives each ordinal (i.e., ‘First’, ‘Second’, etc.) an ordinal value from 1 to 5. The ordinals refer to which week of the month we’ve selected.
These computations support the work to populate the week-long calendar.
Mini-Calendars
Also on the setting sheet, in the Table for MINI-CALENDAR computations table, is a region that calculates the start date and end date of the month of interest and for the two months on either side of it. The computation of the current month’s start day (in cell B4) uses the following formula
DATE(B2,LOOKUP(B1,D,E),1)
where B2 is the year, the LOOKUP() finds a numerical representation of the relevant month, and the 1 represents the first day of the month. The the numerical representation of the day is calculated using the formula
WEEKDAY(B4, $B$3)
(The second argument in the formula determines whether a week starts on a Sunday or a Monday. This parameter is n our Settings sheet at B3.) The dates for the prior and subsequent months are used to fill out the mini-calendars.
To fill in the first row of the mini-calendar with day numbers, we use two cute tricks. First, to fill in the number that goes in the Sunday column of the first row, we take the month’s start date and add to it “one minus the numerical representation of the month’s start day”. This
='Table for MINI-CALENDAR computations'::$B$8+DURATION(0,COLUMN()−'Table for MINI-CALENDAR computations'::$B$9)
This command will yield a data of the form ‘MM/DD/YYYY’, but we only want the day numbers. It turns out that you can (and should) format the cell data type to be DAY ONLY. This will give you the day’s number in your cell. Put the above formula in each of the boxes in the first row of your mini-calendar, and you’ll get the proper calendar numbers. However, some might be numbers from the previous month.
To get rid of those, we create a custom conditional format for all rows in the mini-calendar (even though the custom format only needs to used in the first, fifth, and sixth rows of the mini-calendar). The first rule should be “if the date is before” the mini-calendar month’s start date (which can be referenced in the settings sheet) “then” set your font color to the custom color of white (or whatever you chose your calendar’s background color to be). This will make the days from the previous month invisible. The second rule is analogous, instead using “if the date is after” and referencing the last day of the month (as found in the settings sheet).
To fill in the rest of the rows of the mini-calendar, we fill them all in with the relative command
= (cell directly above in the previous row) + DURATION(1)
Which adds a week to the date in the references cell. This completes your first mini-calendar.
The second mini-calendar is completed in an analogous way, instead referring to the start and end dates of the month following your month of interest and the numeric start date of the first day of the month.
Note that the mini-calendar should be built using six rows for the numbers, as this will account for all the possible ways of distributing thirty-one consecutive days no matter when the month starts.
Two-Page Calendar
With all the previous calculations, this part of the document is easy. Every calendar will start on a Monday and end on a Sunday, so placing those static labels is easy. And the number for the first day has already been calculated in the settings sheet; we reference the date of the first Monday that we calculated.
Subsequent days are calculated by adding DURATION(0,1) to each subsequent day. Easy peasy.
The last thing to add to the two-page calendar is a label at the top of the page that declares the start and end dates on the page. We did this using a three row, single column table. In the first row, we put
=Dashboard::D5&" "&IF(Dashboard::E5="September",LEFT(Dashboard::E5,4),LEFT(Dashboard::E5,3))
Which prints the starting day number and a three- or four-letter abbreviation for the month. In the third row of this small table we put
=Dashboard::D6&" "&IF(Dashboard::E6="September",LEFT(Dashboard::E6,4),LEFT(Dashboard::E6,3))
Which prints the ending day number of the week and a three- or hour-letter abbreviation for the month. In the second row, we put the word ‘to’.
Conclusion
This is how you build a two-page week-long calendar. But varying the parameter values on the Settings sheet, you can create a Monday-thru-Sunday sheet for any week in any year.
Since I’m always thinking about ways to automate repetitive tasks, the next project I will consider is an Applescript that will take as inputs a start date and an end date and then outputs the range of two-page weekly calendars as PDFs starting with the week that contains the first date and ending with the week that contains the last date. If I write that script, I’ll share it here.